Home > Africa > South Africa > Pretoria
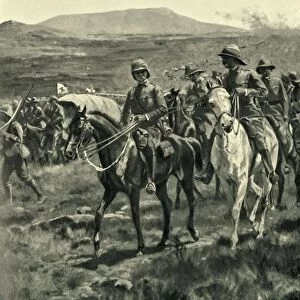
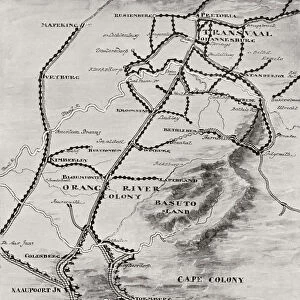
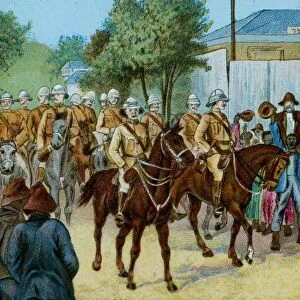
Roberts at Driefontein, 1900

![]()
Wall Art and Photo Gifts from Heritage Images
Roberts at Driefontein, 1900
Roberts at Driefontein, 1900. British Field Marshal Lord Roberts at the Battle of Driefontein. Scene from the Second Anglo-Boer War (1899-1902) fought in what is now South Africa, between Great Britain and the independent Boer republics of the Orange Free State and the South African Republic (known as as the Transvaal by the British). From Coloured Lantern Slides. Junior Lecturers Series. The Boer War of 1900: Chapter IV -- Cronje and Bloemfontein. [W. Butcher and Sons, London, 1900]
Heritage Images features heritage image collections
Media ID 15466920
© The Print Collector / Heritage-Images
1899 1902 1st Earl Roberts 2nd Boer War And Sons Baron Roberts Of Kandahar And Waterford Boer Wars Butcher Earl Roberts Field Marshal Frederick Sleigh Roberts Field Marshal Lord Roberts Frederick Roberts Frederick Sleigh Frederick Sleigh Roberts General Roberts Lantern Slide Lord Lord Frederick Sleigh Lord Frederick Sleigh Roberts Lord Robe Lord Roberts Lord Roberts Of Kandahar Pretoria And Waterford Roberts Second Boer War Sons Ltd South Africa W Butcher And Sons
FEATURES IN THESE COLLECTIONS
> Africa
> South Africa
> Pretoria
> Europe
> United Kingdom
> England
> London
> Related Images
Roberts at Driefontein, 1900 - A Glimpse into the Second Anglo-Boer War
EDITORS COMMENTS
. This print captures a significant moment during the Battle of Driefontein in 1900, showcasing British Field Marshal Lord Roberts amidst the turmoil of the Second Anglo-Boer War. The conflict unfolded in what is now South Africa between Great Britain and the independent Boer republics. Lord Roberts, also known as Baron Roberts of Kandahar and Waterford, stands tall on his horse, exuding an air of authority and determination. Clad in military attire, he epitomizes strength and leadership as he surveys the battlefield with unwavering focus. The image offers a glimpse into the harsh realities faced by soldiers during this tumultuous period. The horses surrounding Lord Roberts symbolize their vital role in warfare - loyal companions who carried brave men through treacherous terrains. As one of Britain's most esteemed military figures, Lord Frederick Sleigh Roberts played a crucial role in shaping history. His strategic prowess led to pivotal victories for the British forces throughout this grueling war. Preserved through time on a colored lantern slide from W. Butcher and Sons Ltd. , this photograph serves as a testament to both human resilience and historical significance. It allows us to reflect upon an era defined by conflict while honoring those who fought valiantly for their respective nations. With its vibrant colors and intricate details captured over a century ago, this print transports us back to a time when courage clashed against adversity on African soil – forever etching itself into our collective memory.
MADE IN THE USA
Safe Shipping with 30 Day Money Back Guarantee
FREE PERSONALISATION*
We are proud to offer a range of customisation features including Personalised Captions, Color Filters and Picture Zoom Tools
SECURE PAYMENTS
We happily accept a wide range of payment options so you can pay for the things you need in the way that is most convenient for you
* Options may vary by product and licensing agreement. Zoomed Pictures can be adjusted in the Cart.